Tutorial on programming Dynamixel servo motors using RoboPlus
Dynamixel servo motors from the Robotis company are recognised worldwide as being the best consumer servo motors, offering the best technology in terms of performance, sturdy construction, precision and functionalities. Robotis offers a wide range of servo motors that stand out by virtue of their performance in terms of speed and driving torque, as well as the ease-of-use of their various functions.
This tutorial guides you through all the steps needed to control your Dynamixel servo motors: connections, programming, transferring programs to the controller and retrieving outputs.
In this example, we will be using a CM-700 controller and a Dynamixel RX-28 servo motor. The programming method is exactly the same for the other Robotis controllers (CM-5, CM-510 and CM-530) and for the other Dynamixel servo motors (AX, RX, EX and MX ranges).
To control a Dynamixel servo motor, you need:
- One (or more) Dynamixel servo motor(s) and its (their) connection cable(s)
- A controller and its PC connexion cable (LN-101 USB interface cable for the CM-700, Bioloid BSC-10 cable for the others, with a USB2Dynamixel (i.e. USB-to-Dynamixel) interface cable if your computer does not have a serial port)
- A regulated power supply or a battery (or an SMPS cable (12V, 5A) depending on the controller)
- A computer on which you have installed the free RoboPlus software (Download)
Step 1: Dynamixel servo motor connection and power supply
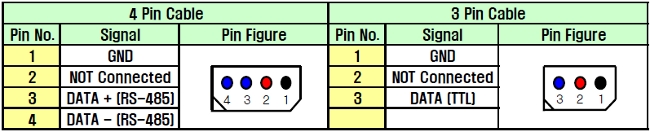
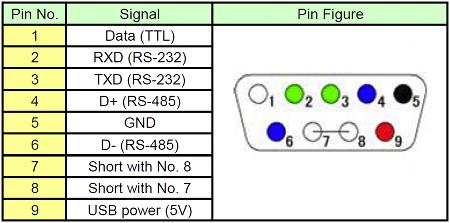
Connect the Dynamixel servo motor to the controller (servo motors in the AX and MX-xxT ranges use TTL communication and the 3-pin connectors, whereas servo motors in the RX, EX and MX-xxR ranges use the RS485 protocol and therefore 4-pin connectors).
Turn on the power supply to the Dynamixel controller: the ‘Power’ LED lights up and one of the Mode LEDs (Play, Edit or Mon) starts to flash. The servo motor’s LED also lights up briefly (less than one second) when the power is turned on.
Connect the controller to your computer. The device should be recognised automatically. If this is not the case, see here for how to install drivers manually.
Step 2: Detecting the Dynamixel servo motor and controller
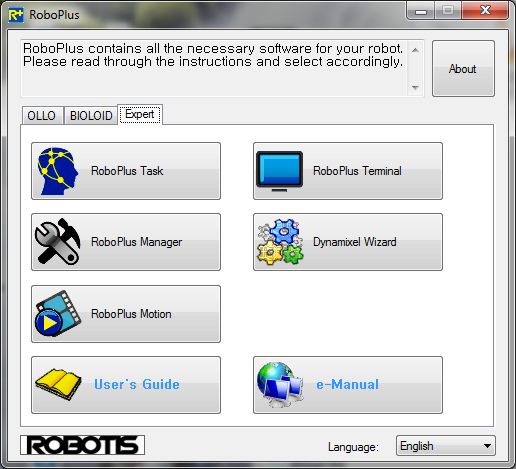
Start RoboPlus, the graphical software supplied free of charge by Robotis used to control and program Dynamixel servo motors in a straightforward manner. In the RoboPlus welcome screen (see below), select ‘RoboPlus Manager’.
On your Dynamixel controller, press the Mode button until the ‘Manage’ (CM-5, CM-510 and CM-530) or ‘Mon’ (CM-700) LED is flashing.
In the top left corner, select the COM port to which your robot is connected, or select ‘Auto Search’. Then click on the ‘Connect’ icon.
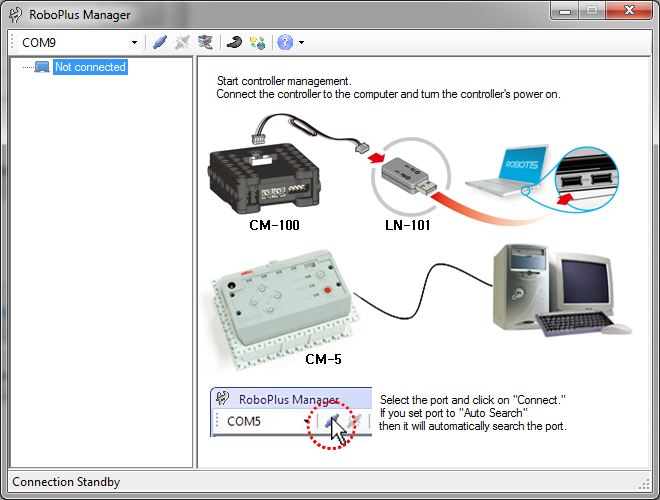
If the connection fails, click on the ‘Windows Device Manager’ icon, and find which port is used by your controller (called ‘USB Serial Port’ under Ports (COM & LPT)).
The software will detect your controller and the servo motors connected to it.
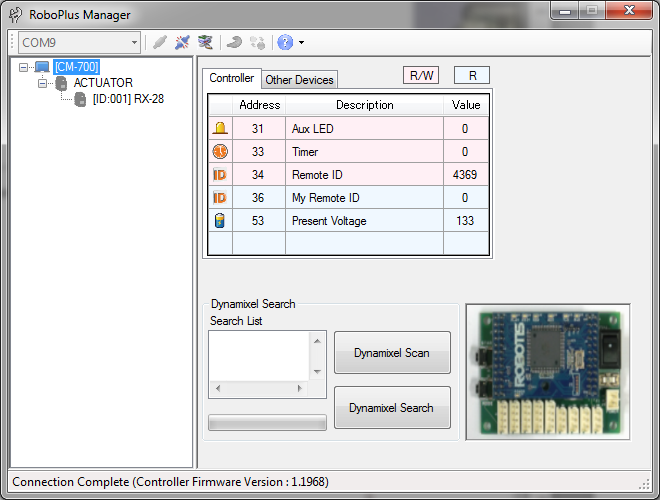
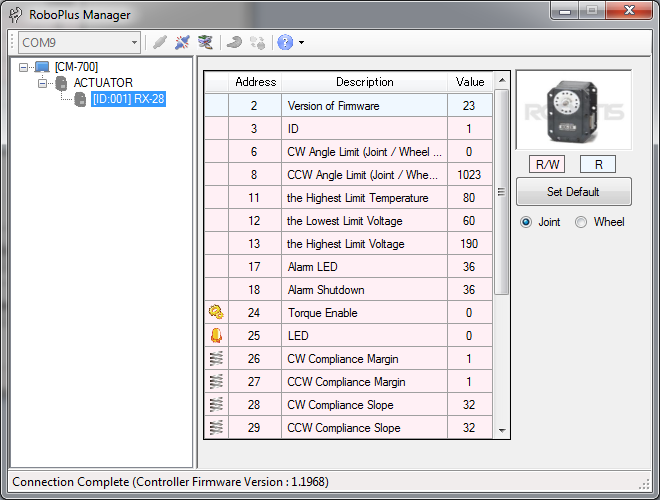
Take note of the ID for your Dynamixel servo motors (actuators), because you will be controlling them using this ID. You also gain access to all the variables relating to your servo motors and your controller. It is at this point that you can decide whether to use your Dynamixel servo motor in ‘Joint’ mode (control in set positions, for robot arms for example) or in ‘Wheel’ mode (continuous rotation, for mobile robot wheels in particular).
Step 3: Programming a task on your Dynamixel servo motor
You can now close RoboPlus Manager and open RoboPlus Task.
Press the controller’s ‘Mode’ button until the ‘Play’ LED flashes. In RoboPlus Task, select the right controller and the COM port.
To start, we are simply going to ask the controller to write the value of the Dynamixel servo motor’s position every second.
Start by double clicking on the first line of the program. A window pops up, offering various types of program commands. Double click on ‘Start program’.
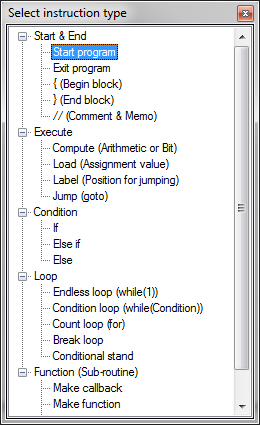
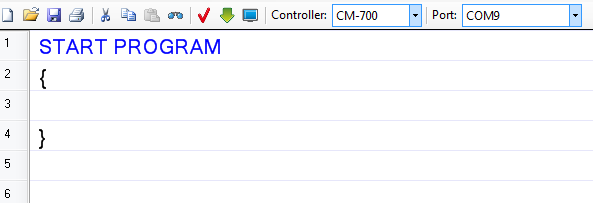
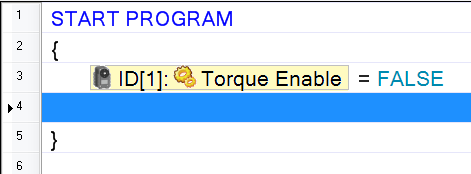
Your whole program must be included inside a pair of curly brackets. Double click on the line between the curly brackets (line 3 in the example), and select ‘Load (assignment value)’
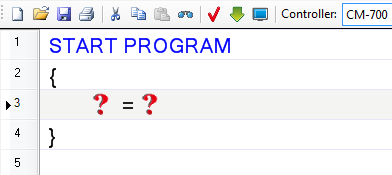
You need to assign values to the two question marks.
Double click on the first, and in the pop-up window, select ‘Dynamixel/Actuator’ and ‘Torque Enable’. Check that the ID at the top of the window matches that for your servo motor (actuator).
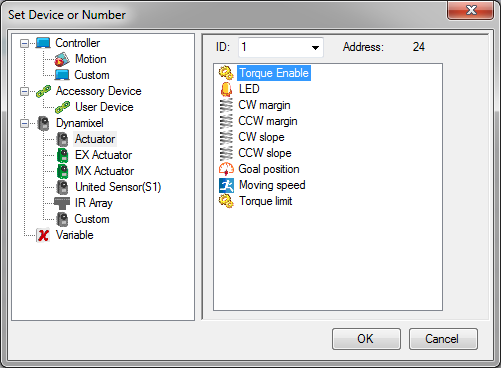
Then double click on the second question mark. In ‘Constant Value’ then ‘True/False’, select ‘False’.
Then create a new blank line in the program using the space bar or a right click.
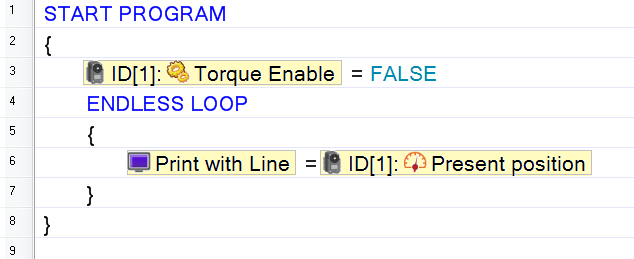
Next, we are going to create an infinite loop, so double click on the new line and select ‘Endless loop (while(1))’. A new block is created, bounded by curly brackets. The code inside this block will be repeated indefinitely.
We are going to display the servo motor’s position in this new block. ‘Load (assignment value)’ needs to be used again. For the first question mark, select ‘Print with Line’ in ‘Controller’. For the second, select ‘Present Position’ in ‘Dynamixel/Actuator’. ‘Print with Line’ is used to display a number between -32767 and +32767, whether it is the value of a sensor, servo motor or hard-coded within the program. However, you cannot use it to display.
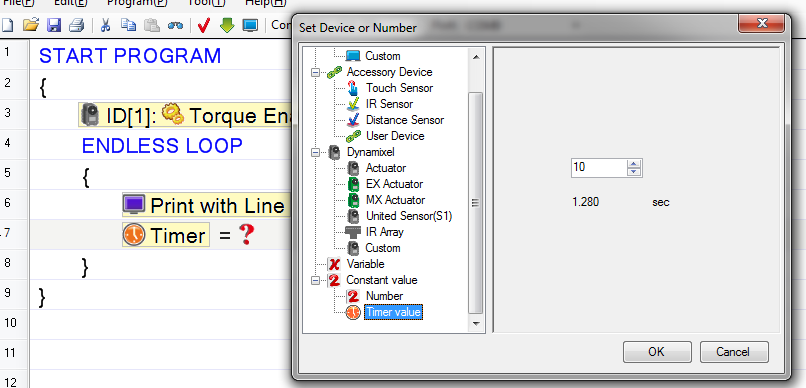
Lastly, to allow time to read the data, we are going to wait one second between taking each measurement. To do so, we will create a timer and wait for it to run down to zero.
Create a new line in the endless loop section and once again select assignment of a value. This time, we are going to assign a ‘Timer value’ (found under ‘Constant value’) of 10 to a ‘Timer’ (in ‘Controller’). You can see the exact duration calculated immediately.
Next, a line has to be created under the Timer, selecting the ‘Conditional stand’ command. Assign the values as below to wait for the timer to reach 0 (note that 0 is a ‘Timer value’).
You can confirm that your code’s syntax is correct by clicking on the small red sign called ‘Rule Check’. The debug panel at the foot of the window will show you the number of variables and size of your program, along with any errors there may be.

The entire program is available here.
Step 4: Downloading and running the program
We are now going to transfer this first, very simple, program into the controller to check that it runs correctly.
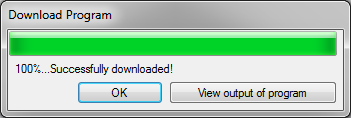
Click on the green arrow to download the program to your controller. When the download is finished, press on the ‘View output of program’ button.
This opens a window called ‘Program Output Monitor’:
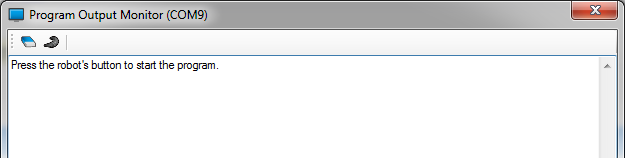
All that remains is to push the ‘Start’ button on your controller. The ‘Play’ LED light is steady while the program is running. The first lines contain your robot’s structure.
The number you have selected is then displayed.
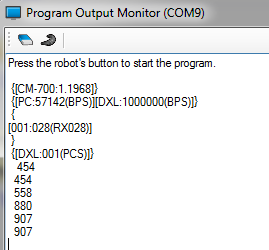
Turn off your controller to stop the program. You can then turn it on again and push the ‘Start’ button once more to re-run the program.
To take it further, we suggest this advanced tutorial, which introduces a more complex example of programming movements for Dynamixel servo motors and the use of RoboPlus Motion.
Using the USB2Dynamixel interface
The USB2DYNAMIXEL can be used either as a USB-to-serial interface or as a direct link to Dynamixel servo motors.
As a USB-to-serial interface (the switch needs to be set to ‘RS232’), you can connect a CM-5 or CM-510 controller (the CM-530 already has a USB interface) directly to a USB port and download your programs exactly as for the CM-700 controller described above.
To communicate directly with Dynamixel servo motors, the switch on the USB2Dynamixel interface has to be set to ‘RS485’ for servo motors in the RX, EX and MX-xxR series, or to ‘TTL’ for AX and MX-xxT servo motors .
Power supply to Dynamixel servo motors when using the USB2DYNAMIXEL interface
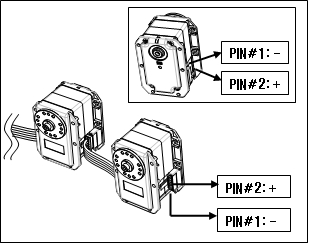
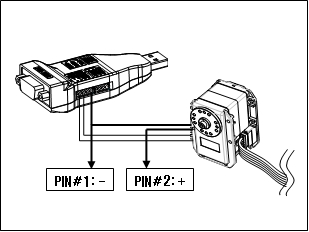
Note that the USB2Dynamixel interface cannot be used to power your servo motors; they therefore need power to be supplied either by using the second connector on the last servo motor in the chain, or by plugging in the connection cable between the USB2Dynamixel adaptor and the first servo motor.
Using the USB2Dynamixel interface with RoboPlus to control a Dynamixel servo motor
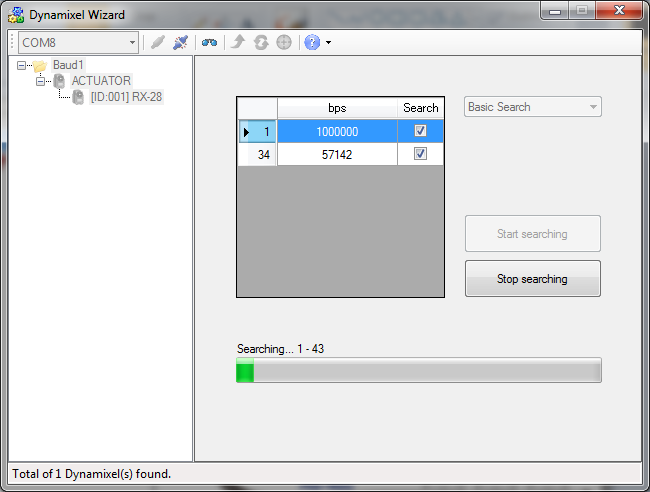
Once you have connected the USB2Dynamixel interface and the servo motors, you can use the ‘Dynamixel Wizard’ component of RoboPlus.
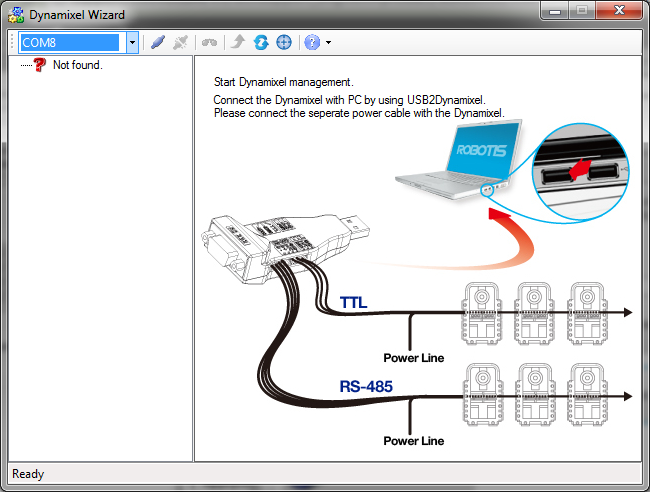
Clicking on the ‘Connect’ button runs the search for all connected elements.
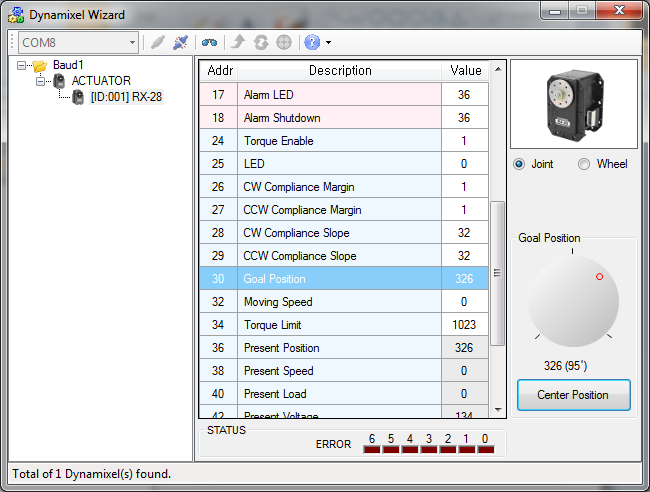
You can then change the servo motor fields directly from the same window, for example running your servo motor by changing the ‘Goal Position’ field.
In contrast, without a controller, you cannot download programs (tasks) to automate your servo motors’ movements.
Generation Robots (http://www.generationrobots.com)
All use and reproduction subject to explicit prior authorization.