The Lego Mindstorms NXT robots
The Lego Mindstorms NXT robot is an affordable programmable robotics platform suitable for beginners and the more experienced alike in the field of mobile and programmable robotics. The Lego Mindstorms NXT robot is used in many schools and universities all over the world.
One of the features of NXT robots is the large number of sensors and accessories available on the market (the Génération Robots website supplies almost all these robotic sensors). The NXT robot can also be programmed using many programming languages:
- NXT-G, which is the graphical development environment supplied with the NXT robot. It is based on the National Instrument LabView software;
- LabView, from National Instrument;
- Lejos, which is a Java library used to program the NXT robots;
- NXC, which is a library in C; and
- Matlab.
And, finally, RobotC which we are presenting here.
RobotC, the programming environment for Lego NXT robots
The RobotC robot programming software application was created and is maintained by the prestigious Carnegie Mellon University in the United States. Anyone with an interest in robotics has heard of this university, which is the benchmark in the field across the Atlantic.
RobotC is a programming environment used to program Lego Mindstorms NXT robots in C. There is also a version of RobotC for Vex Robotics robots.
RobotC is a complete IDE offering a very practical, highly effective interactive real-time debugger. RobotC can multi-task – it can run up to 10 tasks simultaneously on the robot. Moreover, as we shall see below, RobotC installs its own firmware on the robot, firmware that is more efficient than the standard firmware. RobotC programs are the fastest when compared to programs created with other programming software.
By default, RobotC supports all the standard Lego sensors. A third-party open-source library is available and includes all the sensors and accessories found on the market. RobotC therefore provides unlimited programming of the NXT robot.
A 3D simulation tool compatible with RobotC is currently being developed at Carnegie Mellon University (this tool will be included in the version 3.0 of RobotC).
Presentation of the RobotC interface
The RobotC interface is shown in the following figure:
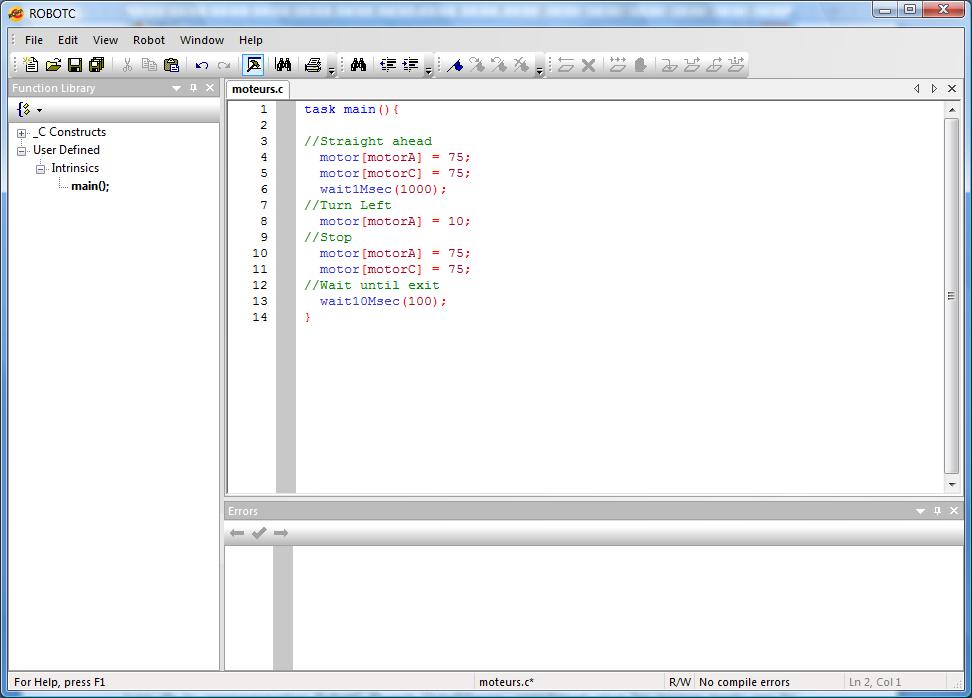
Figure 1 : The RobotC programming interface
The RobotC programming interface is conventional enough for anyone familiar with programming environments. The left-hand bar is used to find the standard code structures, and the error zone at the bottom lists the compiler outputs.
During programming, RobotC runs IntelliSense, which auto-completes terms entered by the programmer for increased efficiency and productivity.
Finally, a relatively comprehensive online support is available from the “Help” menu and, lastly, numerous examples of programs are supplied.
Before using RobotC to program NXT robots
Right! Now the introductions are over, let’s get down to business. As we said earlier, to allow programs created with RobotC to run on the robot, it is best that you replace the firmware (or the robot’s operating system if you prefer) with that of RobotC. This only needs to be done once and is very easy.
To do so, simply go into the “Robot” menu and click on “Download Firmware”. This opens a new window, shown below:
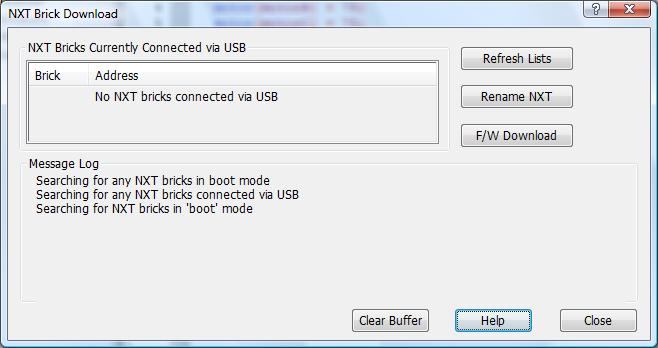
Figure 2 : Firmware update interface
The message is very clear: it cannot find the NXT brick (the robot’s brain). You therefore need to connect the NXT robot to your PC using the USB cable provided and switch on the robot. Then, simply press on the “Refresh Lists” button to allow RobotC to find the robot.
To update the firmware, all that remains is to click the “F/W Download” button and select the firmware in the window that opens. You will hear the brick make a little noise and then reboot itself. All done!!
The window then displays “Firmware download complete”, and you’re ready to go!
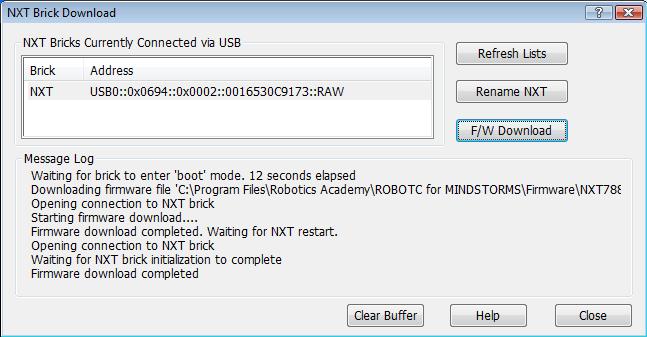
Figure 3 : Firmware downloaded on the NXT
If, after working with RobotC, you wish to work again with NXT-G (the graphical programming software supplied with your Lego kit), you will need to repeat the same procedure in the NXT-G interface, which will revert to its original firmware. It’s as simple as that.
Writing a first program in RobotC for the NXT robots
We are now ready for our first program. Let’s go back to the program shown in Figure 1, which is used to control a differential drive two-wheeled mobile robot, the most common scenario in robotics.
In this program, motors connected to ports A and C on your robot are controlled using the motor function. The value assigned to this function indicates the speed at which the motor runs:
- +100: the motor runs forward at maximum speed
- 0: the motor is stopped
- -100: the motor is running in reverse at maximum speed
Depending on your construction (the direction of the motor on your robot), you will have to use a positive or negative value.
This first simple program also uses two methods allowing the program to be run on a time delay:
- wait1Msec(): Do nothing for a period that is a multiple of one millisecond
- wait10Msec(): Do nothing for a period that is a multiple of 10 milliseconds
Compiling and running
There are two options in the “Robot” menu for compiling the program, or you can use the F5 and F7 keys as shortcuts.
F7 simply compiles the program. This allows you to detect any compilation errors.
F5 compiles and transfers the compiled code to the robot. Naturally, this function only works if the robot is connected, i.e. if the brick is switched on and connected (via USB or Bluetooth) to your computer.
Press F5, and a window will open showing the progress of the program download onto the robot. It then closes, and another opens. This is the “Program Debug” window.
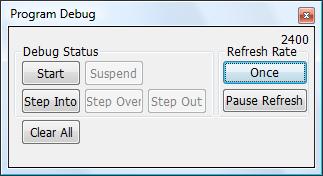
Figure 4 : The “Program Debug” window
If you click the “Start” button, the program you have just downloaded onto the computer will run.
The “Step Into” button will allow you to run the program step by step and activate the other debugging buttons, “Suspend”, “Step Over” and “Step Out”, which allows you to move into or out of a function.
Using sensors and variables for the NXT robots
Let’s make our robot and our program a little more complex. We are going to add a Lego Mindstorms NXT ultrasonic sensor,which, as its name suggests, uses ultrasound sonar to detect the distances to obstacles, and then we will connect it to port No.4 on our NXT brick.

Figure 5: Ultrasonic sensor
We therefore need to inform our RobotC program of the presence of this sensor. To do this, go into the “Robot” menu and click on “Motors and Sensor Setup”. Later you will find out that this step is optional and that a sensor can be declared in the code, but our aim here is to introduce RobotC and a few of its many possibilities.
In the window that opens, click on the “Sensors” tab. In passing, you will also notice that the position of the motors on the robot can also be declared.
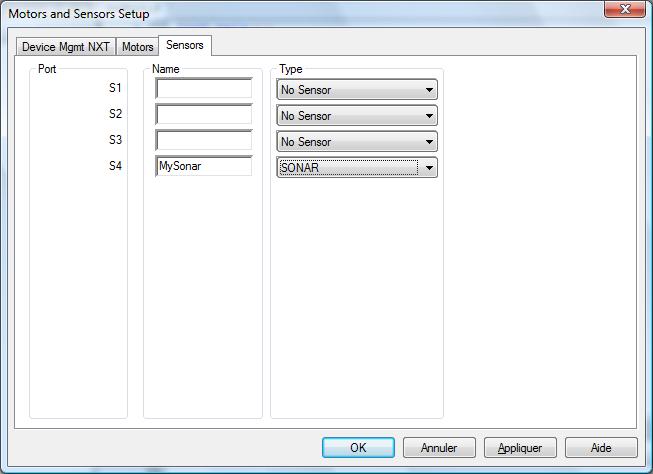
Figure 6: Sensor declaration interface
As shown in the figure above, you can give a name to your sensor and select its type from the drop-down list. Make sure you do this on the port to which your sensor is connected or your program will behave oddly.
Then click on “OK”.
The interface then automatically adds the following instruction in your code:
#pragma config(Sensor, S4, MySonar, sensorSONAR)
//*!!Code automatically generated by 'ROBOTC' configuration wizard
We are going to design a program that will make it move forward in a straight line until it encounters an obstacle, at which point it will make a right turn. There are much more effective obstacle avoidance algorithms (and that is putting it mildly), but that is not the purpose of this article. The following figure shows the code in question.
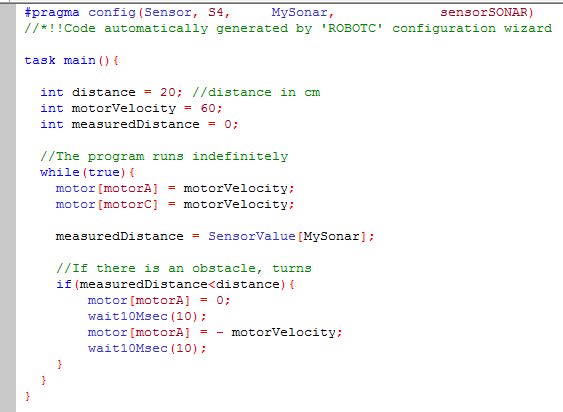
Figure 7: Simple obstacle avoidance code
This code introduces the SensorValue function, which is used to extract the last value measured by the configured sensor, in this case a value measured by the ultrasonic distance sensor.
Before checking how the program behaves on the robot, let’s have a look at the various possibilities offered by RobotC to understand what happens when the program runs. To do this, go into the “Robot / Debug Windows” menu and click on “Global Variables”. Repeat this operation for “System Parameters”.
This opens tabs next to the “Error” tab, which was opened during the first compilation. Now compile and look at what happens in the windows we have just opened.
The “Global Variable” window presents the value of all the variables and constants in your program in real time. If the value is not refreshed, click on the “Continuous” button in the “Program Debug” window.
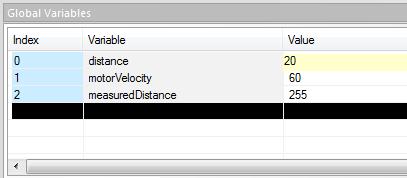
Figure 8: The “Global Variables” window indicates the value of all the program variables in real time
This window is very useful for finding out the system status and the progress of the program in real time: your computer displays the values measured by the various sensors in real time, as well as the values of all the variables and constants, plus the power values assigned to the motors.
The “System Parameters” window meanwhile shows overall system status data.
Conclusion
This article is the first in a series presenting several aspects of RobotC. We have introduced the software here for those who are not familiar with it, and shown a few of the debugging possibilities. RobotC really is a high-performance, simple software application for programming Lego Mindstorms NXT robots and taking your first steps in robotics.
Generation Robots (http://www.generationrobots.co.uk)
all use and reproduction subject to explicit prior authorization.