This article presents NXT-G, the development environment supplied with Lego Mindstorms NXT. We will be presenting the main characteristics of this graphical environment and describing how to use and design a program using NXT-G.
Lego Mindstorms NXT
![]() The Lego Mindstorms NXT kit has been on the market since 2006. This robot is easy to build and modify (being based on the famous Lego bricks) and is also very comprehensive. The basic kit comes with no fewer than 3 servo motors and 4 sensors. However, what makes the difference as far as personal robotics and especially autonomous robots are concerned is the ability to program the robot.
The Lego Mindstorms NXT kit has been on the market since 2006. This robot is easy to build and modify (being based on the famous Lego bricks) and is also very comprehensive. The basic kit comes with no fewer than 3 servo motors and 4 sensors. However, what makes the difference as far as personal robotics and especially autonomous robots are concerned is the ability to program the robot.
One of the major interests of recreational robotics is the possibility of making your robot as autonomous as possible and able to carry out specific tasks. To this end, having an advanced, easy-to-use programming system is an important factor in the choice of robot. Lego Mindstorms NXT offers a highly effective graphical programming language that is easy to use even for those with no particular skills in development languages.
This language is called NXT-G and is supplied with the basic kit (which is not the case with all ranges of robots). This is the programming environment we will be presenting in this article.
The NXT-G programming environment
 The installation CD supplied with the basic kit is used to install NXT-G. This environment is compatible with Mac and PC. The minimum technical requirements are as follows:
| Microsoft Windows
| Apple Macintosh
|
The NXT-G environment is a specific version of the professional LabView product (http://www.ni.com/labview) published by National Instruments. In other words, the basic platform is reliable. LabView is indeed very widely used in the industry.
What is the interface of NXT-G like?
The figure below shows the NXT-G development environment.
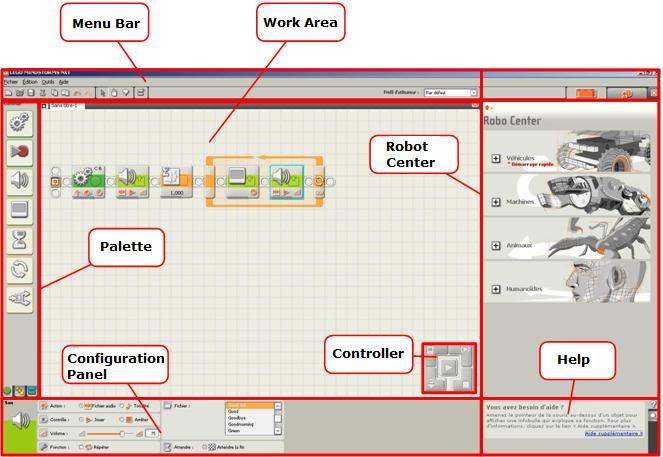
- The palette lists the function blocks that can be dragged/dropped into the work area;
- The work area is where your program is designed;
- The configuration panel presents the settings that you can adjust when you select a block in the work area;
- The controller is used to compile the program and transfer it to the robot (by USB connection or Bluetooth);
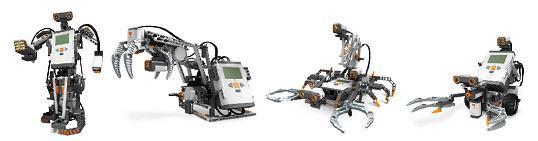
- The Robot Center is the place where the tutorials are to be found allowing you to build and program one of the 4 main categories of robot that can be constructed using Lego Mindstorms NXT (vehicles, robot arms, animals and humanoids). These tutorials behave like videos, allowing you to produce your first programs step by step in a very instructive way. A second tab is available in this space, giving access to the Lego portal where you will be able to visit forums, download additional sounds for your robot, etc.; and
- The online help contains all the support you need to use the interface.
Programming principles of NXT-G
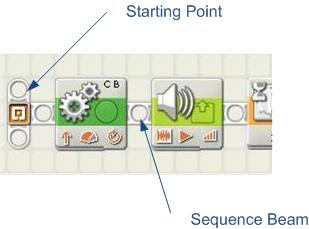
Programming using NXT-G is entirely graphical. No programming knowledge is required to produce advanced programs using NXT-G. Strictly speaking, you will not create any lines of code using NXT-G. By default, the work area only shows a starting point. From this starting point, you drag and drop one of the boxes from the palette. The blocks are added one after the other on an axis termed the sequence beam.
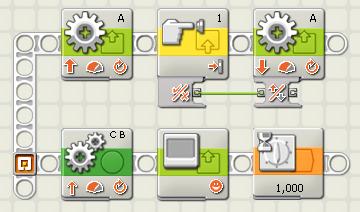
Blocks that are not connected to a sequence beam are not taken into account by the program. It is possible to build a design running more than one program sequence in parallel. To do this, additional sequence beams can be created from the starting point, as shown in the following figure.
The blocks available in NXT-G
NXT-G is supplied with 35 blocks. Additional blocks can be downloaded from the internet and you can also create your own blocks. When a non-standard sensor is purchased (e.g. the CMUCam webcam), the sensor is supplied with a CD containing an additional block making it possible to configure and interact with the sensor
The blocks can be divided into 7 main families, as per the NXT-G help.
- Common blocks
- Action blocks
- Sensor blocks
- Flow blocks
- Data blocks
- Advanced blocks
- Customised blocks
It is easy to see from this list that the palette of programs that can be created using NXT-G is very large. Let’s take a quick look at the blocks available.
| Block | Description |
“Display” block | This NXT-G block is used to display a text on the LCD screen of the NXT intelligent brick. |
“Loop” block | This NXT-G block is used to create a loop in your program, thus allowing you to repeat the same series of actions several times, while certain conditions are not met. |
“Motor” block | This NXT-G block is used to activate a servo motor. It is possible to indicate the direction, speed and duration of rotation. |
“Sound” block | This NXT-G block is used to play a sound (a beep, a series of different recorded tones or a sound file) from the NXT intelligent brick. |
“Switch” block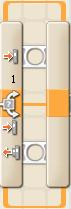 | This NXT-G block is used to create conditions in your program and thus only perform certain actions if specific conditions are met. |
“Rotation sensor” block | This NXT-G block is used to determine the number and/or angle of rotation performed by a servo motor. |
“Ultrasonic sonar sensor” block | This NXT-G block is used to interact with the ultrasonic sonar sensor and thus detect obstacles and their distance from the robot. |
“Light sensor” block | This NXT-G block is used to interact with the light sensor and thus determine the quantity of light received by the sensor. |
“Sound sensor” block | This NXT-G block is used to interact with the sound sensor and thus determine the intensity of the sound reaching the sensor. |
“Touch sensor” block | This NXT-G block is used to interact with the touch sensor and thus determine if the sensor has been pressed or released. |
“Compare” block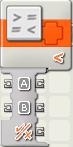 | This NXT-G block is used to make logical comparisons in your program. |
“Maths” block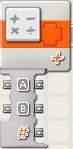 | This NXT-G block is used to carry out basic calculations such as addition, subtraction, multiplication and division. |
“Bluetooth receive message” block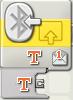 | This NXT-G block is used to process messages received by Bluetooth. There is also a block allowing you to send messages via Bluetooth. Using Bluetooth wireless communication technology, your robot can communicate with your PC or other Lego Mindstorms NXT robots. |
“Timer” block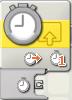 | This NXT-G block is used to manage a timer. |
“Variable” block | This is a very useful NXT-G block that is used to create and manipulate variables in your program. |
A first program using NXT-G
The first program using NXT-G we are going to design here is relatively simple. It uses the sound sensor and displays the sound level (as a percentage of the sensitivity of the sensor) on the screen of the robot’s intelligent brick.
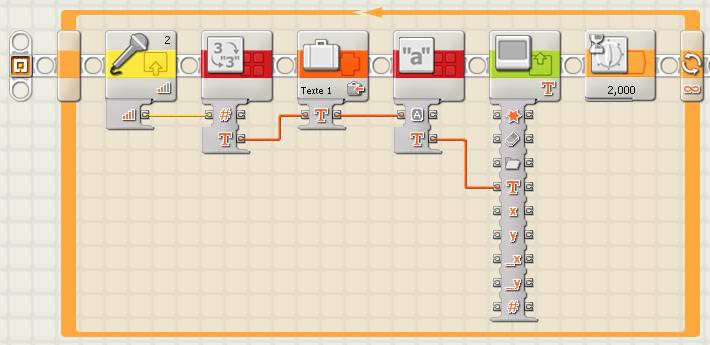
The final program using NXT-G is illustrated in the following diagram:
We are going to build this program step by step.
Click on New in the File menu. This creates a new program with a blank work area. For greater ease, use the entire palette (click on the second tab at the bottom left, in the vertical tool bar).
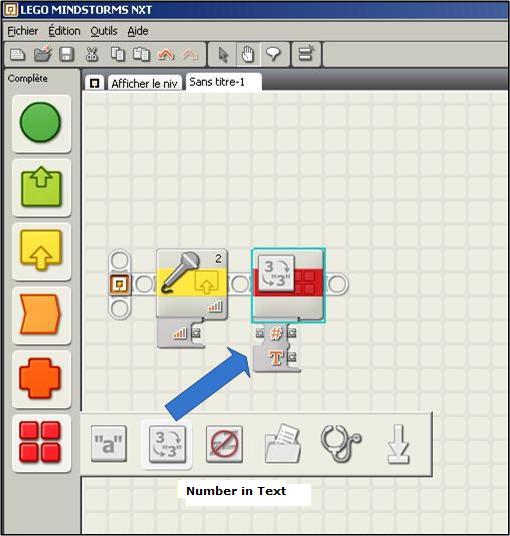
Open the list of “Sensor” blocks and drag the sound sensor to the sequence beam as shown in the figure below:

In the list of “Advanced” blocks, drag the “Number as text” block as shown in the following step.
Now that you have got the idea, repeat this operation to place the following blocks in order on the sequence beam:
- The “Variable” block, which you will find in the list of “Data” blocks. In the configuration panel for this block, select the text type variable and ensure the “Write” button is checked. This tells our program that the variable we are going to use is a write variable;
- The “Text” block, which you will find in the list of “Advanced” blocks;
- The “Display” block, which you will find in the list of “Action” blocks. From the drop-down list shown in the configuration panel, select “Text”. This tells the block to expect to display text data; and
- The “Wait” block, which you will find in the list of “Flow” blocks. This block is used to indicate the time between two measurements (we will leave it at 2 seconds by default).
Put this entire sequence into a loop so that the program will repeat several times and you will consequently obtain measurements at regular intervals.
To do this, drag a “Loop” block from the list of “Flow” blocks and then move all the blocks in the work area inside the loop, keeping them in order and ensuring that they remain on the sequence beam, (remember that a block that is not on a sequence beam attached to the start point will not be interpreted by the program, although this will not generate an error).
By default, the loop is set to “Forever”. This means that the program will run indefinitely until you stop it by pressing one of the buttons on the intelligent brick.
If you wish, you can change this by clicking on the loop and entering a set a number of display iterations in the configuration panel for the loop block (the configuration panel updates automatically according to the block you have just clicked on). If you only want to display 10 measurements, select “Counter” in the drop-down list and enter 10 in the “Count” space that appears below.
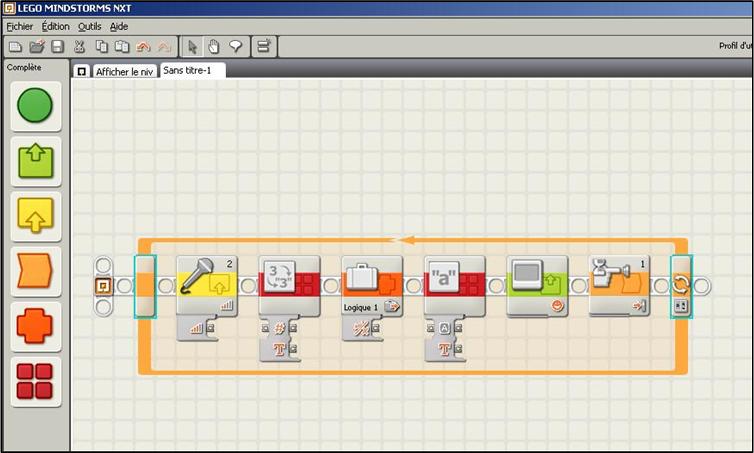
At this stage, your program looks like the figure below.
You now need to link the blocks so that they pass data to each other.
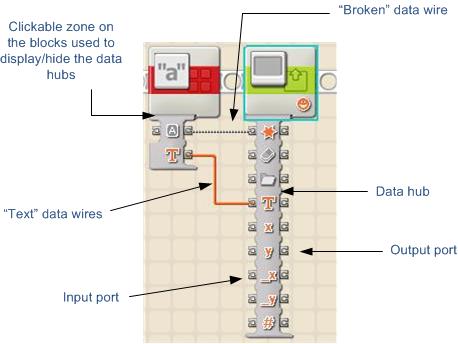
To exchange information, the blocks use data wires. Data wires are used to pass data from one block to another. The colour of the data wire determines the type of data:
- Numerical data is transmitted by yellow wires.
- Logical data (Booleans) is transmitted by green wires.
- Text data is transmitted by orange wires.
If your wire is grey, this means that the input port is expecting a value of a type that is not the type defined by the output port on the first block. This is termed a broken wire. Broken wires are therefore errors in your program.
The following figure tells you a little more about data hubs and wires in NXT-G:
Now that you know now a little more and you have practised opening data hubs and drawing data wires between blocks, let’s finish our program.
Go back to the first figure in this paragraph and draw data wires between the correct ports. Remember that a grey dotted data wire tells you that you have made a mistake. Only coloured wires are correct.
Here are a few comments on these data wires. We have numbered them for clarity.
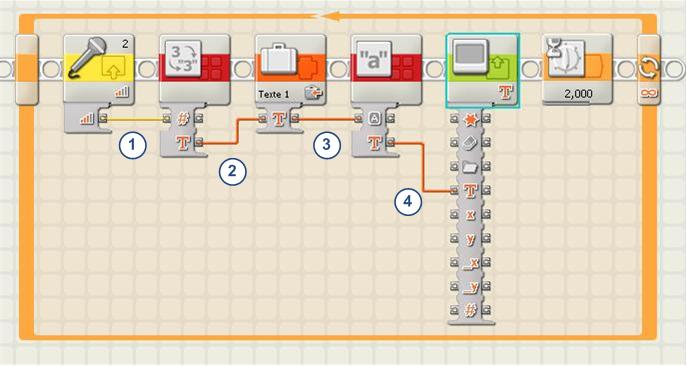
- This first wire is used to send the sound level read by the sound sensor to the block that will convert the numerical value into a text value. The first block therefore uses a yellow wire (the value read is numerical). The block that transforms the number into text is correctly expecting a yellow wire.
- The second wire sends the measurement thus converted into text (consequently resulting in an orange wire) to a text variable.
- The variable populated in this way is stored in the memory (it is extracted from the variable) by means of the text block and the orange wire.
- Finally, the last data wire sends the variable read to the Display block, which will display the value on the screen of the NXT intelligent brick.
Save your work and then test it on your Lego Mindstorms NXT robot by clicking on the “Download and run” button in the centre of the controller.
| Comment: The data read by the sound sensor is relative data, expressed as a percentage of its sensitivity. This does not give a measurement in decibels for example. There are more sensitive sensors on the market that give a level in decibels and are compatible with Lego Mindstorms NXT. However, given that you can calibrate the sensors (using a brick supplied in NXT-G), you can link the values measured with decibel levels. |
The next step
National Instruments, the publisher of the LabView professional software, offers a toolkit that adapts to LabView, making it possible to go further in robot creation and development.
National Instruments’ idea is quite simple: provide a simple, effective environment with NXT-G and then, for those who wish to take things further and get professional with their robot building, LabView becomes the natural tool to use. From this perspective, Lego Mindstorms NXT acts as a prototype platform.
Generation Robots (http://www.generationrobots.co.uk)
–
All use and reproduction subject to explicit prior authorization.