Carry out simulations and make your DARwin-OP walk with Gazebo and ROS
The Darwin-OP robot is one of the very few completely open-source humanoid robots to be commercially available (another being the Poppy robot, on sale soon!). This makes it an ideal platform for many hobbyists and researchers.
The DARwin-OP is quite an investment, however, which is why a simulator can prove not only extremely useful, but also practical for testing risky behaviours!
Below we will explain how to use the open-source Gazebo simulator with a DARwin-OP model and then how to use it with the ROS middleware, in particular to simulate walking.
This guide draws on the concepts outlined in our "Gazebo robotics simulator with ROS" tutorial. We therefore highly recommended that you read it first.
Preparation
First, you should check you’ve installed all the dependencies correctly.
There are some complexities surrounding the Gazebo version and the ROS version. This guide is based on the ROS Hydro and Gazebo 1.9 versions, but the code is also compatible with ROS Indigo.
-
Follow the Gazebo installation instructions
-
Then those for ROS Hydro
-
To complete preparation, enter the following command:
apt-get command
sudo apt-get install git ros-hydro-desktop-full gazebo ros-hydro-gazebo-plugins ros-hydro-gazebo-ros ros-hydro-gazebo-ros-control ros-hydro-hector-gazebo ros-hydro-hector-gazebo-plugins ros-hydro-effort-controllers ros-hydro-joint-state-controller ros-hydro-joint-state-publisher ros-hydro-turtlebot-teleop
DARwin-OP simulation ROS packages
As in our previous tutorial, begin by creating and configuring a new workspace:
cd ~
mkdir -p ros-darwin/src
cd ros-darwin/src
source /opt/ros/hydro/setup.bash
catkin_init_workspace
Now retrieve the DARwin-OP ROS packages available on our GitHub HumaRobotics, and build and source the workspace:
git clone https://github.com/HumaRobotics/darwin_description.git
git clone https://github.com/HumaRobotics/darwin_control.git
git clone https://github.com/HumaRobotics/darwin_gazebo.git
cd ..
catkin_make
source devel/setup.bash
Don’t forget, you’ll need to source each terminal you launch wit ~/ros-darwin/devel/setup.bash
First launch
Everything’s ready, it’s time to move on to the test phase!
roslaunch darwin_gazebo darwin_gazebo.launch
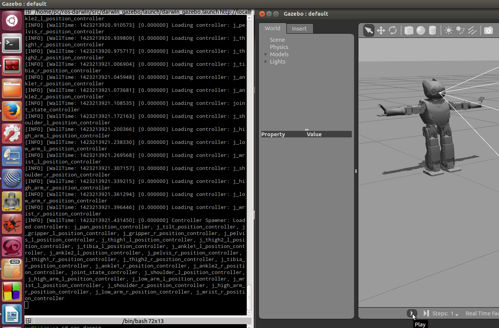
After typing this command, Gazebo should launch and the DARwin-OP robot model should normally appear.
Search carefully through the output messages, looking for a series of "Loading controller: ..." then "Controller Spawner: Loaded controllers:..." (you should see them scroll by towards the end).
These messages mean that the ROS controllers are active and will block the motors in position 0 (as shown in the image). You can click on the "Play" button in Gazebo to actually run the simulation (if you don’t wait long enough, you risk seeing Darwin collapse on itself before the controllers are in place).
Okay, that’s all very well, but there’s not a lot happening at the moment. This is because all we’ve done so far is expose DARwin-OP to ROS.
So let’s make our little Darwin move a little – we’ve provided a demo that you simply need to launch in a second terminal (sourced):
rosrun darwin_gazebo walker_demo.py
The following video shows what happens:
ROS Exposition
The aim of this section is to provide a model of the robot exposed to ROS so that it can be controlled by other nodes, ultimately enabling you to control the actual robot or the simulation using the same code.
Let’s take a look at the components already available:
rostopic list
A certain number of the topics in the resulting list provide access to the robot’s sensors:
/darwin/camera/image_raw #   =>   Provides access to the camera image
/darwin/imu #                =>   Provides information on the inertial measurement unit
/darwin/joint_states #       =>   Provides information on position/speed/torque for each joint
The camera and inertial measurement unit are provided by Gazebo plugins in darwin_description/urdf/darwin.urdf. The joint_states topic is provided by the node robot_state_publisher which is configured and launched in the package darwin_control.
You can observe the data supplied by these sensors directly by typing:
rostopic echo /darwin/imu
rostopic echo /darwin/joint_states
You can use the image_view package to obtain the camera image:
rosrun image_view image_view image:=/darwin/camera/image_raw
For the effectors, each joint can be controlled in position (radians) by sending messages on the following topics:
/darwin/j_ankle1_l_position_controller/command
/darwin/j_ankle1_r_position_controller/command
/darwin/j_ankle2_l_position_controller/command
/darwin/j_ankle2_r_position_controller/command
/darwin/j_gripper_l_position_controller/command
/darwin/j_gripper_r_position_controller/command
/darwin/j_high_arm_l_position_controller/command
/darwin/j_high_arm_r_position_controller/command
/darwin/j_low_arm_l_position_controller/command
/darwin/j_low_arm_r_position_controller/command
/darwin/j_pan_position_controller/command
/darwin/j_pelvis_l_position_controller/command
/darwin/j_pelvis_r_position_controller/command
/darwin/j_shoulder_l_position_controller/command
/darwin/j_shoulder_r_position_controller/command
/darwin/j_thigh2_l_position_controller/command
/darwin/j_thigh2_r_position_controller/command
/darwin/j_thigh2_l_position_controller/command
/darwin/j_thigh2_r_position_controller/command
/darwin/j_tibia_l_position_controller/command
/darwin/j_tibia_r_position_controller/command
/darwin/j_tilt_position_controller/command
/darwin/j_wrist_l_position_controller/command
/darwin/j_wrist_r_position_controller/command
For example, to rotate the robot’s head to the left then to the right simply send:
rostopic pub /darwin/j_pan_position_controller/command std_msgs/Float64 -- 1
rostopic pub /darwin/j_pan_position_controller/command std_msgs/Float64 -- -1
Walking and teleoperation
For walking, a dedicated darwingazebo/scripts/walker.py node awaits walking commands on the /darwin/cmdvel topic.
For example, you can move the robot forward then stop it by entering:
rostopic pub /darwin/cmd_vel geometry_msgs/Twist '[1,0,0]' '[0,0,0]' # Vitesse en X: 1
rostopic pub /darwin/cmd_vel geometry_msgs/Twist '[0,0,0]' '[0,0,0]' # Vitesse nulle: arrêt
Most robots mobile under ROS use the same cmd_vel topic to receive their move commands. This means that by modulating a remapping of the topic names, you can reuse existing teleoperation nodes.
For example, the turtlesim keyboard teleoperation (not recommended because the speeds are not appropriate):
rosrun turtlesim turtle_teleop_key /turtle1/cmd_vel:=/darwin/cmd_vel
More suitable is the Turtlebot keyboard teleoperation node, which not only allows you to adjust the speeds but also to stop the robot. It does not, however, allow you to send lateral move commands. To use it:
rosrun turtlebot_teleop turtlebot_teleop_key /turtlebot_teleop/cmd_vel:=/darwin/cmd_vel
Python API
In order to ease the use of the robot, we provide a client ROS Python API. This means that this Python API communicates only through the ROS topics and services, making it transparent in terms of networking, also it does not care whether it is a simulated or real robot, as long as the ROS exposition is the same.
To understand the API, the simplest way is to take a look at the demo script gazebo/scripts/walker_demo.py:
#!/usr/bin/env python
import rospy
from darwin_gazebo.darwin import Darwin


if __name__=="__main__":
    rospy.init_node("walker_demo")


    rospy.loginfo("Instantiating Darwin Client")
    darwin=Darwin()
    rospy.sleep(1)


    rospy.loginfo("Darwin Walker Demo Starting")


    darwin.set_walk_velocity(0.2,0,0)
    rospy.sleep(3)
    darwin.set_walk_velocity(1,0,0)
    rospy.sleep(3)
    darwin.set_walk_velocity(0,1,0)
    rospy.sleep(3)
    darwin.set_walk_velocity(0,-1,0)
    rospy.sleep(3)
    darwin.set_walk_velocity(-1,0,0)
    rospy.sleep(3)
    darwin.set_walk_velocity(1,1,0)
    rospy.sleep(5)
    darwin.set_walk_velocity(0,0,0)
    rospy.loginfo("Darwin Walker Demo Finished")
Let’s describe this code:
#!/usr/bin/env python

import rospy from darwin_gazebo.darwin import Darwin
Here we first specify that our script has to be interpreted with Python, then we load the ROS API and the provided Darwin API.
if __name__=="__main__":
    rospy.init_node("walker_demo")

    rospy.loginfo("Instantiating Darwin Client")
    darwin=Darwin()
    rospy.sleep(1)
In this section, we start by creating a ROS node called walker_demo, this is necessary to communicate with the ROS infrastructure. We then create and instance of the Darwin class that encapsulates our Python API. The 1 second wait allows for all ROS topics to be properly initialized.
    darwin.set_walk_velocity(0.2,0,0)
    rospy.sleep(3)
    darwin.set_walk_velocity(1,1,0)
    rospy.sleep(5)
    darwin.set_walk_velocity(0,0,0)
Now we make actual calls to the API, by sending walk velocity commands. These can combine multiple components (X and Y translations, and Theta rotation). Sending speed 0 makes the robot stop. These calls are non blocking, this is why we add a sleep in order to let the robot walk for a bit at the requested speed.
On can also directly control the joints in position using the set_angles function.
For instance, if we want to make Darwin’s head turn to the left then to the right we do:
    darwin.set_angles({"j_pan":1})
    rospy.sleep(1)
    darwin.set_angles({"j_pan":-1})
    rospy.sleep(1)
Conclusion
We couldn’t cover everything in this tutorial, but we’ve provided you with all the basics you need to begin playing with DARwin and Gazebo.
In a future article, we’ll be studying API movements in more detail in order to describe complex animation, and we’ll also see how the node allowing Darwin to walk works.
In the meantime, if you’re nice, I’ll maybe give you a model for another robot. Did I hear someone say hexapod?
Dr. Philippe Capdepuy, research engineer at Génération Robots and HumaRobotics