Steuerung von Dynamixel Servomotoren mit Robo Plus
In diesem Beispiel verwenden wir zwei Dynamixel Servomotoren und eine pan-tilt Konfiguration und die Taster auf dem Dynamixel Kontroller (CM-5, CM-510 oder CM-530; Achtung der CM-700 controller hat keine Taster) , um diese zu steuern.
Daher schauen wir uns die direkte Steuerung der Dynamixelservomotoren, die Erstellung der Funktionen in RoboPlus, und die Verwendung genauer an. Dieses Tutorial geht davon aus, dass Sie bereits Basiskenntnisse mit RoboPlus und Dynamixelservomotoren haben. Wenn das nicht der Fall ist, sollten Sie mit dem Tutorial 1 zur Programmierung von Dynamixel Servomotoren mit RoboPlus starten.
Aufbau der Pan-Tilt Einheit mit den Dynamixel Servomotoren
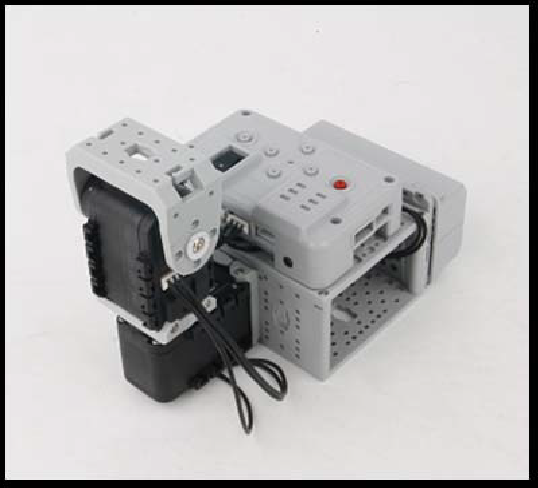
Bauen Sie Ihre Servomotoren, wie in folgender Abbildung zu sehen ist, zusammen:
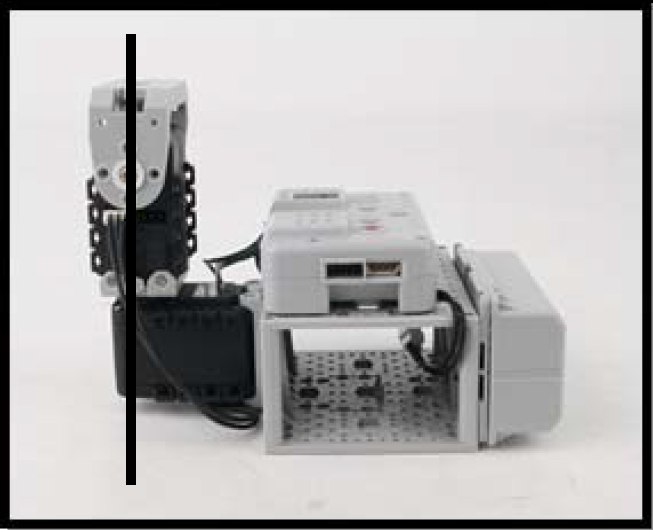
Achten Sie darauf Ihren Servo auf die mittlere Position (512) zu stellen, bevor Sie diese montieren:

Eine detailierte Montageanleitung finden Sie hier.
Programmierung der Dynamixel Servomotoren in Pan-Tilt Konfiguration
Detektieren Sie alle Servomotoren mit dem RoboPlus Manager, danach erstellen Sie eine neue Datei als RoboPlus Task.
Wir erstellen als erstes eine Funktion, um die Motorpositionen zu initialisieren. Anschließend werden wir in der Hauptfunktion die Servos mit verschiedenen Tastern steuern.
Doppelklicken Sie auf eine Zeile in der Task-Datei außerhalb des Hauptprogrammes (der "Starte Programm" Block) und wählen Sie den "Make Function" Befehl. Nennen Sie Ihre neue Funktion "InitialAction"
In this new function, we are going to initialise the speeds of the two servo motors and put them in their median position: 512 if the position sensor has 1,024 positions, and 2,048 for Dynamixel servo motors in the MX range where the sensor has 4,096 positions. Use the ‘Load (assignment value)’ command to carry out these actions. Your servo motors’ closed loop control (‘torque enable’) is usually enabled by default.
We then want to wait for the servo motors to have reached their position before moving on to something else. We are going to use the ‘Conditional stand’ command, then check the ‘moving’ value for each motor.
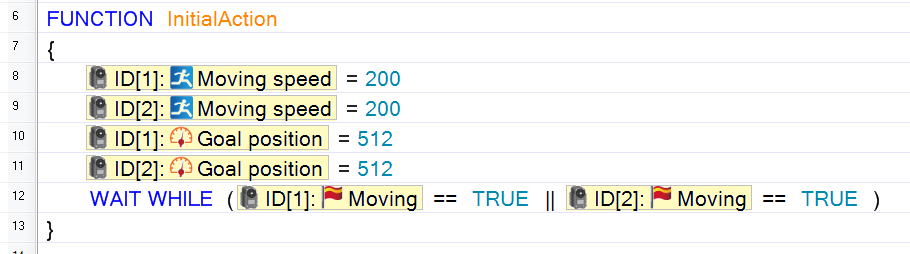
The command above means ‘Wait while motor 1 is moving or while motor 2 is moving’. It is therefore necessary for both motors to have completed their movements for the wait to end.
In the main program, call the InitialAction function, then create an infinite loop.
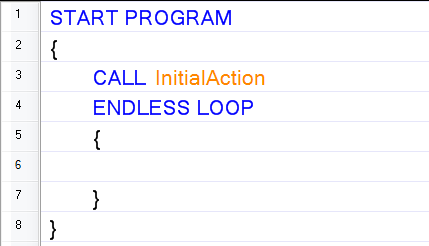
Within this endless loop, if one of the controller buttons is pressed, we are going to give a move command to the motors.
First, the program must check that the command we give does not exceed the servo motor’s capacity. To avoid collisions, we will restrict it to positions between 310 and 710. The ‘compute (arithmetic or bit)’ command must be used to carry out an operation (an addition, here) on a value and assign it to another value (or the same value, here the motor’s target position).
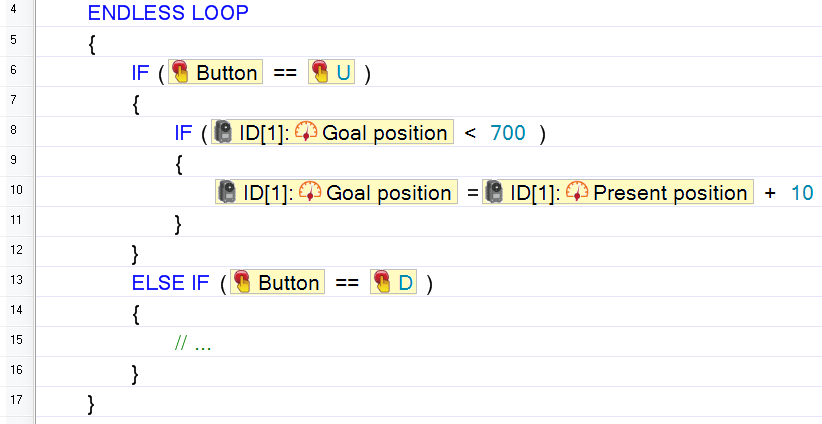
The IDs of the servo motors must naturally be altered, as must the direction of change for the target position, depending on the assembly of your servo motors.
The entire program is available here.
Using RoboPlus Motion to create movements for robots using Dynamixel servo motors
RoboPlus Motion is a tool enabling you to manage your robot’s movements. Using it, you can create and save sequences to be subsequently sent to the controller (in the form of a *.mtn motion file) and executed by the robot.
Set your controller to ‘Edit’ or ‘Program’ mode (depending on the controller). Then, in RoboPlus Motion, choose the right COM port (or run a search) and click on the ‘Connect’ button.
RoboPlus Motion automatically opens the motion file already present in your controller for you. If the left part of the window remains greyed out, it means you do not yet have a motion file in your controller.
The RoboPlus Motion workspace is then divided into 3 areas.
The RoboPlus Motion sequence management area
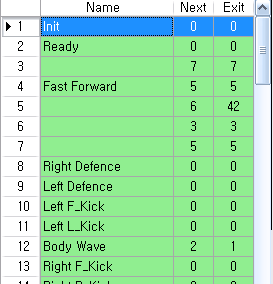
The left area shows everything contained in a motion file (and therefore what is sent to the robot). It holds up to 255 movement sequences, also called ‘motion pages’ (for example, raise arm, take a step, open pincers, etc.).
You can give a name to each sequence and state which sequence comes next by putting the following sequence number in ‘Next’. A sequence is limited to 7 steps as explained below, therefore complex movements need to be divided into several sequences.
The ‘Exit’ column is used to define a movement in the event that execution is halted midway, so you can set a final movement to avoid the robot stopping suddenly in an unstable position.
The RoboPlus Motion sequence creation area
The middle panel is used to manage sequence content.
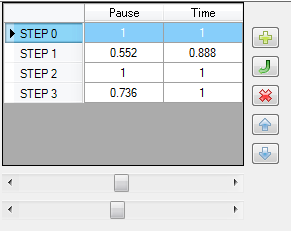
Each sequence contains between 0 and 7 steps. Steps can be added, deleted or shifted using the buttons, and they can be copied and pasted (into pre-existing steps).
A ‘step’ contains:
- A 'pose', meaning the position values for the servo motors, defined in the rightmost ‘pose editor’ panel;
- A 'run time', between 0.072 and 2.04 seconds, the time that the robot takes to reach the position. The shorter the time, the less smooth the movement will be. You can alter it with the second slider;
- A 'pause time', during which the robot will stay motionless before starting the next movement. The pause time is between 0 and 2.04 seconds, and you can change it with the first slider.
The lower part of the middle panel applies to the entire sequence. It enables you to set the number of times the movement is to be repeated, the ‘speed rate’ to carry out the entire sequence more quickly or more slowly (whereas the run time for a pose concerns only one part of the sequence) and the maximum acceleration (called ‘Ctrl Inertial force’). This parameter takes values between 0 and 127, and is 32 by default. The higher the value, the lower the acceleration and the more gradual the movement; the lower the value, the higher the acceleration will be.
The program automatically calculates the time necessary to carry out the movement.
You can also select the servo motor compliance level: the lower the number, the softer the joint established will be. This enables more fluid movements, but is not recommended for a walking movement, for example. The value varies from 1 (very low joint softness) to 7 (very high joint softness).
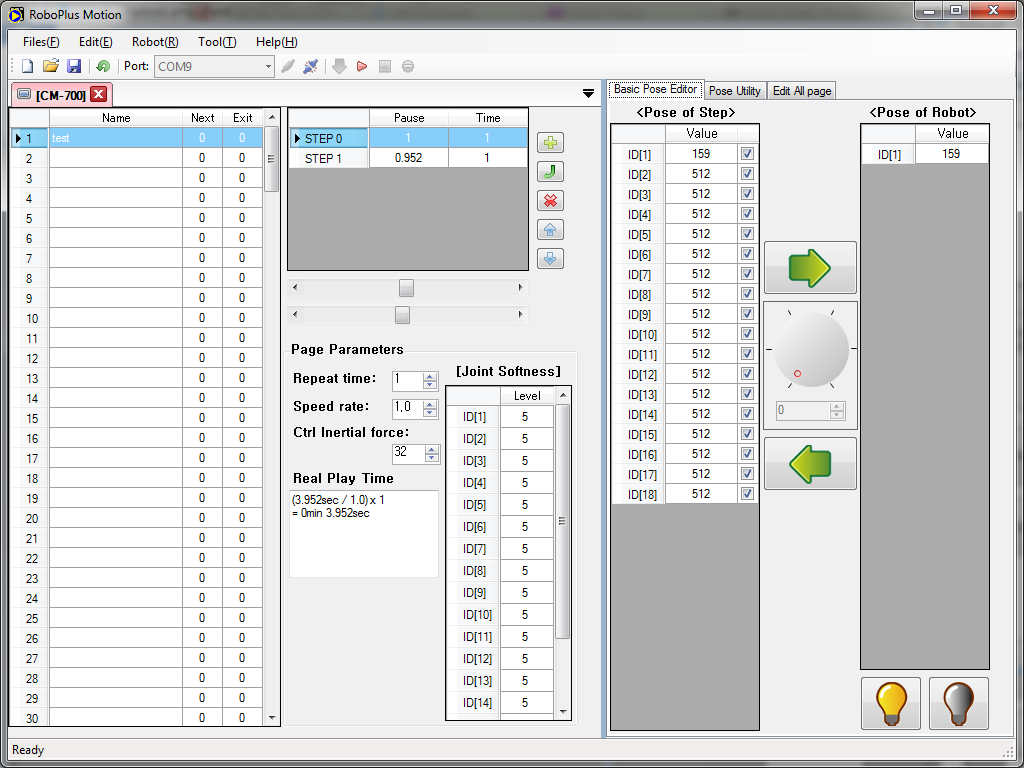
Pose creation page for Dynamixel servo motors
The right panel is the pose creation area. Here is where you are going to set each servo motor’s position for each step.
It comprises two lists of servo motor positions. The rightmost list, called ‘pose of robot’, shows your servo motors’ current positions. You can disable the joint (to move your robots by hand) by clicking on the unlit bulb at the bottom.
The left list is called ‘pose of step’. It contains the values for the position on which you are currently working.
The two green arrows enable you to either apply the pose to the robot (upper arrow) or save the robot’s position as a pose (lower arrow).
The other two tabs are:
- 'Pose Utility', which contains a robot simulator for standard Bioloid models;
- 'Edit all pages', which is used to amend all the motion pages at once, to add or remove a servo motor or to change the resolution of a sensor (depending on the servo motor model).
Using a motion file in RoboPlus Task to operate the Dynamixel servo motors
Once you have defined your poses, steps and motion pages, you can download the file onto your robot by using the green arrow. If you are already working on the file that is in the controller, you can run the file directly with the red triangle.
To run your motion file from a task program, use the ‘Load (assignment value)’ command and set ‘Motion Page’ to the number corresponding to the sequence to be run.

Generation Robots (http://www.generationrobots.com)
All use and reproduction subject to explicit prior authorization.