This article describes how to use the Parallax Say It Voice Recognition Module to control a Boe-Bot robot using your voice. Speech recognition is an important asset for a robot, increasing its ability to interact with human beings and above all using their most natural form of communication.
 |
The Say It Module is a board specially produced for Parallax by Veear (http://www.veear.eu). |
In this article, we will be showing you how to install the Say It Module on a Boe-Bot robot, how to configure the Say It Module using the graphical interface supplied, how to test these settings, and how to generate BS2 code to trigger actions according to the recognised words, since this is after all the ultimate goal. The article therefore follows a logical order. However, before introducing the Say It Module, a quick recap of the fundamentals of speech recognition may prove useful.
For an introduction to the Parallax Boe-Bot robot, please refer to this article.
The fundamentals of speech recognition
Introduction and operation
Automatic speech recognition together with speech synthesis is part of what is known as speech processing.
The aim of speech recognition is to analyse a word or phrase picked up by a microphone and transcribe it in text form onto a computer (or equivalent) so that it can be used. The main uses of speech recognition are automatic dictation or vocal applications over the telephone.
This is a two-phase operation:
- The acoustic signal is extracted and broken down into 30-microsecond segments for analysis. For each of these segments, something known as an acoustic image is extracted. This is in fact a vector of the main characteristics of the signal.
- The idea is then to determine for each segment the phoneme most likely to correspond to this signal. The phoneme is the smallest unit of spoken language. The English language is made up of between 44 and 47 phonemes, depending on the dialect. For each segment of signal, the program determines the probability of match with each phoneme and combines these probabilities with the pronunciation probabilities for a word (since a word is a sequence of phonemes, certain series of phonemes are more likely than others, simply because they form words) and the probability of a word occurring in the target language (some words are more frequent than others).
To find out more:
http://en.wikipedia.org/wiki/Speech_recognition
Sphinx is an open source speech recognition software application: http://cmusphinx.sourceforge.net
In the context of robotics
Introducing speech recognition is a natural goal in robotics as it is one of the most common forms of communication for humans. In human language, this is referred to as natural language. This is very advanced as it depends on the context, the person, the moment, etc. Although a great deal of progress has been made in robotics in recent years, it has not yet mastered this.
Leaving aside highly advanced robots in laboratories such as ICub, or the very impressive progress made in the military sector, the problems encountered in personal robotics are more mundane. Speech recognition with a mobile robot depends not only on the quality of the components but also on the environment (as always with robotics), which can be noisy or cause an echo, or modify the perception of the sound due to its shape (the robot could perceive a sound differently if it is going along a wall for example). As you will see later, controlling a robot using your voice is more complicated than sitting in front of your desk dictating to your computer using a microphone.
Installation and configuration of the Say It Module
The Say It Module
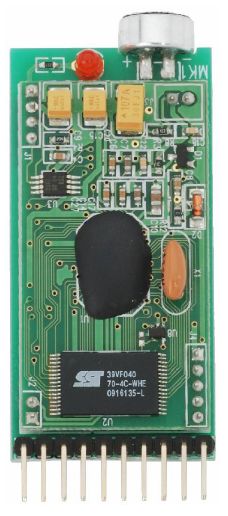
The Say It Module is a board measuring 6.3 cm by 1.3 cm that plugs into the application connector. It has a microphone at the top and a very useful LED telling the user when the module is in voice recognition mode. It can be used to record up to 32 commands (configured words).
Connecting the Say It Module to the robot
The Say It Module plugs into the application connector (circled in red on the picture below). The power switch must be at 0 when the board is plugged in.
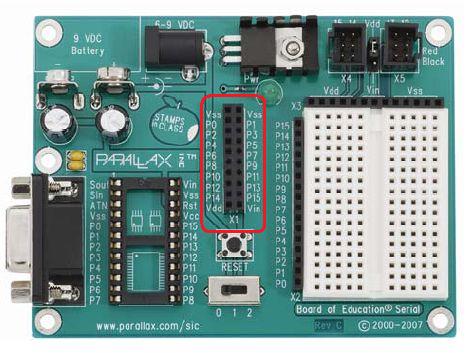
Be aware that the way you connect the board is important. To avoid mistakes, the Vdd sign (Vdd is the 5V regulated input) is marked at the bottom left on the back of the Say It Module. The pin closest to this sign should therefore be connected to the connector marked Vdd on the application connector (in the bottom left of the diagram above).
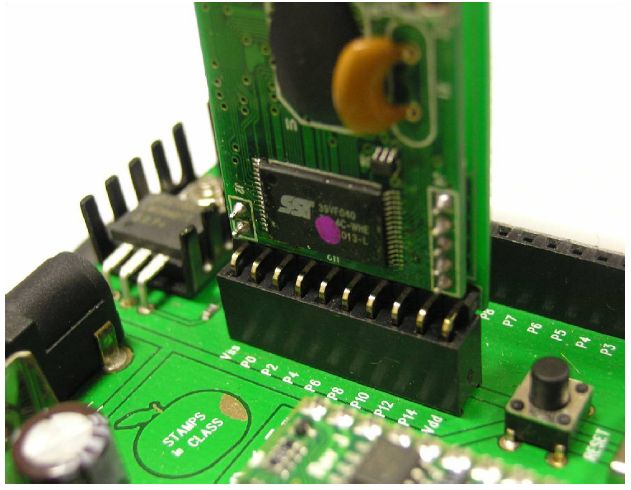
Once connected, the Say It Module is in the following position:
Once the board is plugged in, download and install the Say It GUI application. This can be obtained by clicking on http://www.parallax.com/Portals/0/Downloads/docs/prod/comm/SayItGUI-1.1.5.zip
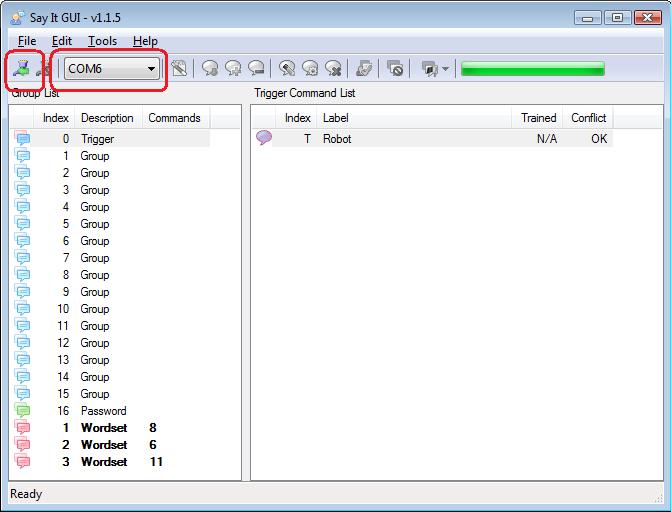
Once the software is installed, turn on the power to the Say It board by switching the Boe-Bot power switch to 1 and launch the Say It GUI software. You must specify the COM port to which the Boe-Bot robot is connected and press the Connect button (both circled in red in the figure below). Please note that the BASIC Stamp Editor programming environment Debug terminal must be closed when you click the Connect button.
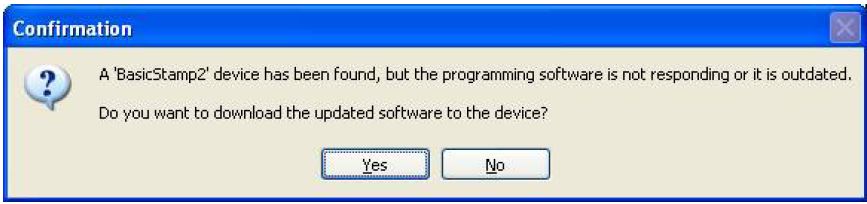
If this is the first time you are connecting the Say It Module, it will automatically ask you if you want to download something called a “Bridge” onto your BASIC Stamp. This BASIC Stamp add-on is required to operate the Say It Module. Click on Yes, and leave it to download the Bridge. When it has finished, the progress bar at the top right of the Say It GUI interface will be completely green.
All done!! You are now ready to start using the module.
If you need any further details, you can download the full documentation for the Say It Module in English at http://www.parallax.com/Portals/0/Downloads/docs/prod/comm/30080_SayItModulev1.2.pdf
A first test
Before changing the settings on the module, we are going to test the words pre-programmed on the module to get an idea of how it is used and of the various concepts we will be needing later.
To carry out the following tests, ensure your robot is connected to your computer using the USB cable and that you have connected the robot in the Say It GUI interface as explained previously in this document. Set the power switch on your robot to position 1 (i.e. board on but motors off).
In the Say It GUI interface, select the first line in the list on the left displaying the word Trigger, then click on the Group Test button as shown in the figure below.
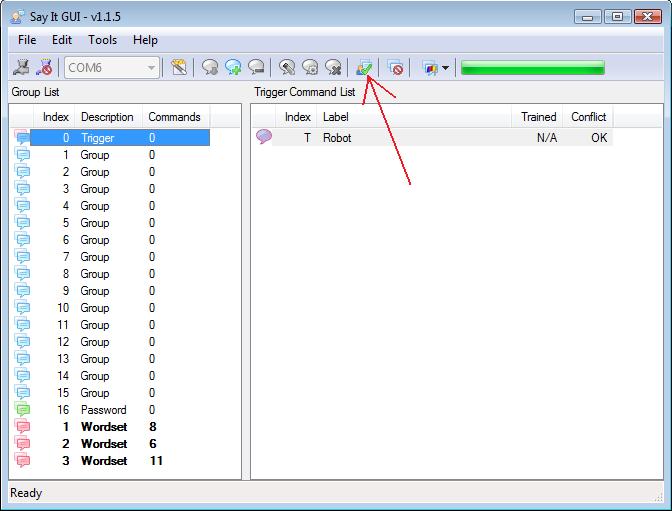
When you press this button, the Say It Module is in listening mode for a few seconds and tries to recognise the word or words contained in the selected group (here the word “robot” is the only word configured in the Trigger group). Say the word “robot” close to the Say It board microphone. If it does not recognise the word, it will display a small window with the word “timeout”, indicating that it has not managed to recognise the word “robot” within the allotted time of the listening phase. If, on the other hand, it has recognised the word, it will highlight the word in light green in your interface (a light green that flashes for a few seconds).
You will have noticed that the LED on the Say It board lights up when the robot is in listening mode. This will prove very useful later on.
You can also practise with other groups, such as wordset group no. 1 (which contains eight words) or the other two wordset groups (which contain six and eleven words).
A bit more about concepts
In the last paragraph, we looked at the trigger concept and other concepts such as groups and wordsets. Let’s look at these in more detail.
Triggers
This is the word used to trigger speech recognition, hence the name. The robot knows that after this word you are going to say a word that will correspond to a command.
Groups
The configured words are commands, as they are meant to trigger an action (we will do this later). Commands are separated into groups.
Wordsets
Wordsets are pre-programmed groups in which words cannot be added or deleted.
Configuring your own commands
To add a new command, proceed as follows:
- 1Select the group to which you wish to add the new command.
- Click on the Add Command button, which is the button resembling a cartoon speech bubble with a green cross on it.
- Enter the name of the command in the line that has just been added to the right-hand window. The name can be any chain.
- Select the line you have just added by clicking on it (it should be highlighted in blue).
- Click on the Command Training button resembling a cartoon speech bubble with a cog wheel on it. The following window opens:
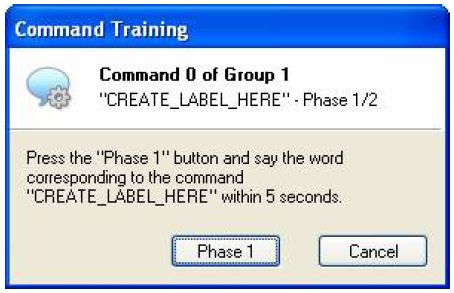
- Click on the Phase 1 button and say the word you wish to save once.
- Click on the Phase 2 button (which will have replaced the Phase 1 button) and repeat the word corresponding to the command.
That’s it, your command is now configured. To test it, use the Group Test button as before. If you are not satisfied, start the configuration process again. Commands are deleted using the Remove Command button.
Now you know how to add a command, you can populate your own groups.
Generating a BS2 code
You have already seen that the Say It Module can recognise commands, and that we can also add commands. Let’s now see how to tell the robot to perform an action when it recognises a command.
The Say It GUI allows you to generate BS2 code (PBASIC) using the Generate Code button (the one showing a magician’s wand on a white sheet of paper).
Generating and testing code
In our example, we have added the following five commands to group 1:
- FORWARD
- STOP
- REVERSE
- RIGHT
- LEFT
The interface asks you what to call and where to put the generated code. Once you have done this, you can close the Say It GUI and use the BASIC Stamp Editor, the Boe-Bot programming environment.
The generated code is quite long but, before testing it, you must change a parameter, i.e. the value of the VRGROUP parameter. Its default value is 0, which means it is expecting to recognise commands from group 0. In our example, we have added the five commands to group 1, so the VRGROUP value must be 1.
In the same way, in order for our test to be more relevant, we have modified part of the code as follows. Although this modification is not essential, it makes the test more eloquent (no pun intended!).
| Before change | After change |
 |
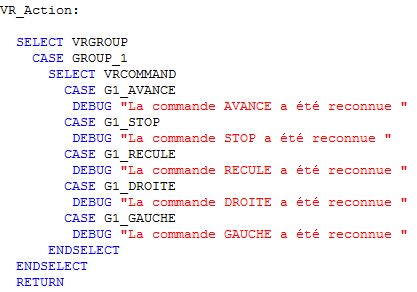 |
Run the modified program and test the various commands one after the other. The Debug Terminal should look like this:
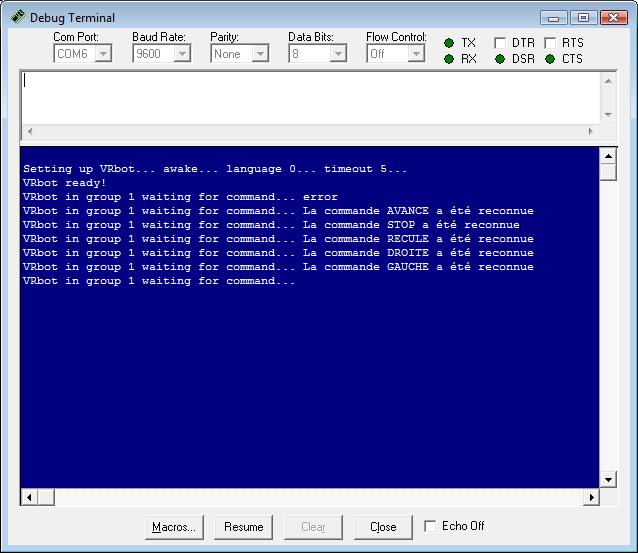
The first line contains the word “error”, indicating that it did not recognise any configured command during the listening phase. This shows how the generated code works, i.e. that the listening phase is in a loop that lasts five seconds each time. To change this setting, change the value of the VRA1 parameter in line 81.
Adding robot commands
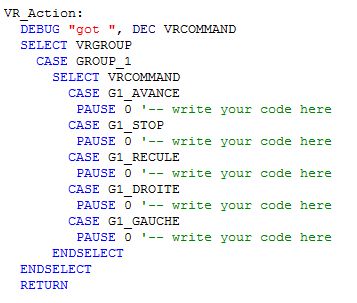
We have added a series of routines at the end of the final code allowing the robot to move forwards, backwards, etc. and we have also added the call statement to these routines in the piece of code already changed previously, as shown in the following figure:

The code now allows you to control the robot using your voice! The complete code can be downloaded by clicking on this link.
To take the experience further, an example code is available from Parallax at http://www.parallax.com/Portals/0/Downloads/docs/prod/comm/SayItExampleCode.zip. In particular, it allows you to test the trigger concept.
All that remains for you to do now is test out this speech recognition module!
Generation Robots (http://www.generationrobots.co.uk)
Explicit prior permission is required for any use or reproduction